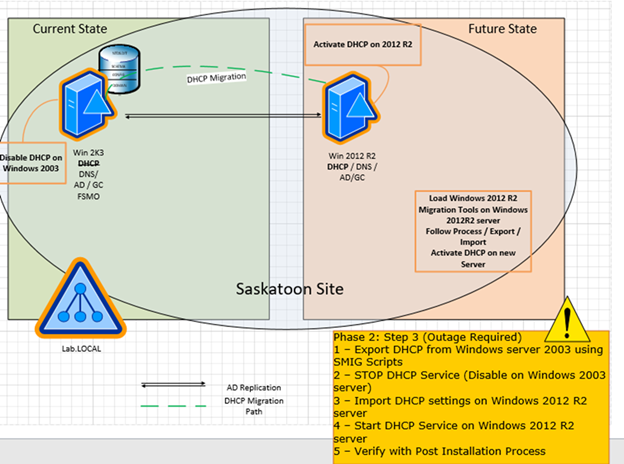
Microsoft was ending support for the Windows server 2003 operating system on July 14, 2015, but still have some customer are using Windows server 2003 and need us to migrate them to windows server 2012 R2 or Windows server 2016.
You can easy to migrate your DHCP server from Windows server 2003 to 2012 R2 server if you follow below step by step procedure.

Installing the Windows Server Migration Tools on Windows 2012 R2 (Destination Server)
- Logon to windows server 2012 R2 as domain administrator
- Open Server Manager, select Manager, and then click Add roles and features to start the Add roles and features Wizard.
- On the Add roles and features Wizard page, select Role-based or feature-based installation, and then click Next.
- On the Server Selection page, keep the default server selection and click Next.
- On the Server Roles page, keep the default selection and click Next.
- On the Features page, select Windows Server Migration Tools and click Next.
- Click Install on the Confirmation page.
- Click Close to exist from the wizard.
Creating Server Migration Tools package for windows 2003 R2 (Source Server)
- Using an account with administrator permissions, log on to the Windows Server 2012 R2 server which Windows Server Migration Tools was installed.
- Open Server Manager, select Tools. And then click Windows Server Migration Tools.
- In the Command Prompt, change the directory to c:\windows\system32\ServerMigrationTools, using the cd command.
-
Type the command .\Smigdeploy.exe /package /architecture amd64 /os ws03 /path
c:\post-install and press Enter.
This command creates the installation package for a Windows Server 2003 x64 server and places the files in the c:\post-install\SMT_ws03_amd64 folder. If the SMT_ws03_amd64 folder is not already created, the above command creates it automatically.
Note:
- For Windows Server 2003 x64 source server
SmigDeploy.exe /package /architecture AMD64 /os ws03 /path c:\post-install
- For Windows Server 2003 x86 source server
SmigDeploy.exe /package /architecture x86 /os ws03 /path c:\post-install
- For Windows Server 2008 (R2) x64 source server
SmigDeploy.exe /package /architecture AMD64 /os ws08 /path c:\post-install
- For Windows Server 2008 x86 source server
SmigDeploy.exe /package /architecture x86 /os ws08 /path c:\post-install
Copy the newly created directory to the Windows Server 2003 (2008) machine (Source Server).
Exporting DHCP Servers Setting from a Windows Server 2003 R2 DHCP Server (Source Server)
- Click Start, click All Programs, click Administrative Tools and select DHCP.
- In the DHCP Server Console, right-click the DHCP Server and select Backup.
- Select Backup location and click OK.
- Right-click DHCP Server, select All Tasks, and select Stop to stop DHCP services. Close the DHCP window.
- Click Start, click All Programs, click Administrative Tools, click Windows Server Migration Tools, select PowerShell version of Windows Server Migration Tools.
- In the PowerShell window, type .\Servermigration.psc1 and Enter.
- Next, type the command Export-SmigServerSetting –FeatureID DHCP
–User All –Group and press Enter.
- Enter c:\post-install\DHCPExport for the path.
- Provide a password to secure the exported data.
- Close the PowerShell window.
Copy the directory to the Windows Server 2012 R2 (Destination Server).
Importing DHCP Server Settings to a Windows Server 2012 R2 DHCP Server (Destination Server)
- Using an account with Administrator permissions, log on to the Windows Server 2012 R2 server.
- Open Server manager and then select Tools, click Windows PowerShell.
- In the PowerShell window, type Net stop “DHCP Server”.
- Type Add-PSSnapin microsoft.windows.servermanager.migration to use
the migration tolls command set.
- Type the command Import-SmigServerSetting –FeatureID DHCP –User All –Group –Verbose -Force and press Enter.
- Enter c:\post-install\DHCPExport for the path.
- Provide the password and press Enter.
- Once import complete and report successful, type exit and close PowerShell Window.
- Type Start-Services
DHCPServer to start the DHCP server.
- Open Server manager and then select Tools, click DHCP.
- Review the scope settings, leases and other information.
- In the Console Pane, right-click the local server node and select Authorize.
- Refresh the window and verify the server is operational.
RollBack
- Change the IP Address back from the Target to the Source Server
- Enable the DHCP Service
- Set Startup Type to Automatic
- Disable the DHCP Service on the Target Server
Hope you enjoy this post.
Cary
Twitter:@SifuSun
