
Configure Exchange Server 2016
Verify Existing Client Access Namespaces
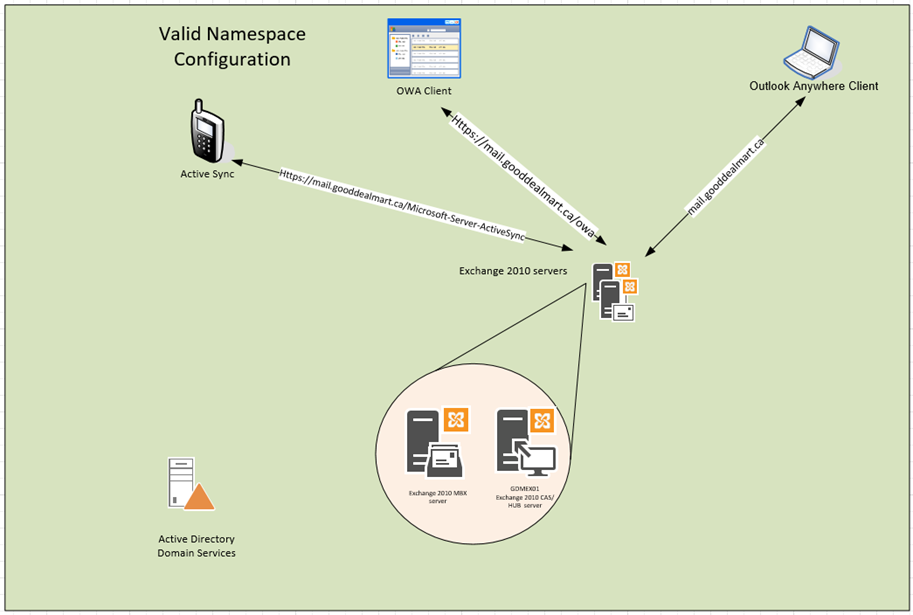
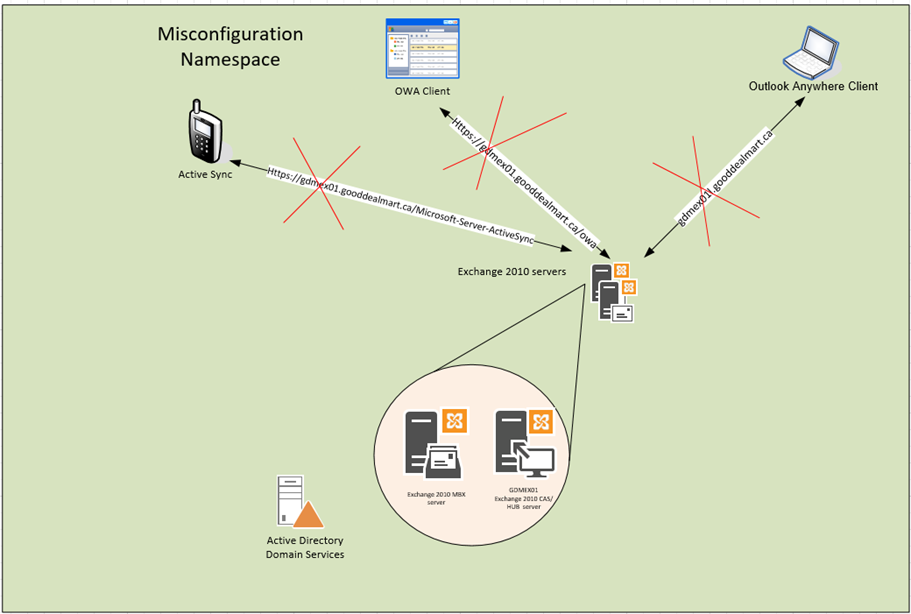
It’s a good time to verify the Namespace configuration and correct them if there are any misconfigured namespaces.
- Login to Exchange 2010 server.
- Open Exchange Management Shell
-
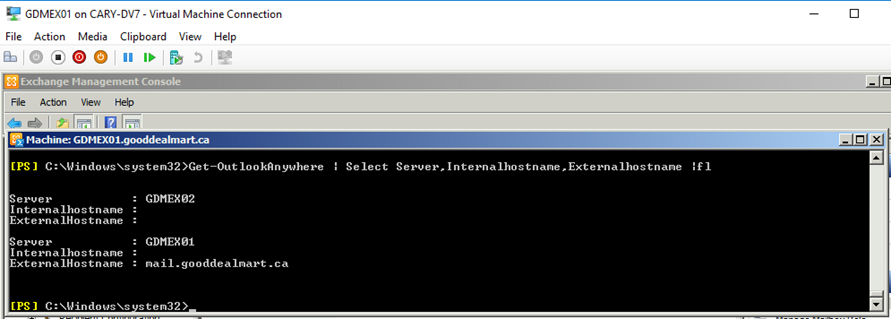
Run follow cmdlet to check outlook Anywhere namespace
Get-OutlookAnywhere | Select Server,Internalhostname,Externalhostname | Fl
 Note NoteIf upgrading from exchange 2010. Outlook Anywhere must be enabled and IIS Authentication Must be configured for co-existence, run follow cmdlet to enable Outlook Anywhere and configure IIS Authentication.
Get-ExchangeServer | Where {($_.AdminDisplayVersion -Like "Version 14*") -And ($_.ServerRole -Like "*ClientAccess*")} | Get-ClientAccessServer | Where {$_.OutlookAnywhereEnabled -Eq $False} | Enable-OutlookAnywhere -ClientAuthenticationMethod Basic -SSLoffloading $False -ExternalHostName mail.gooddealmart.ca -IISAuthenticationMethod Basic
Run follow cmdlet to configure IIS Authentication if Outlook Anywhere already enabled.
Get-ExchangeServer | Where {($_.AdminDisplayVersion -Like "Version 14*") -And ($_.ServerRole -Like "*ClientAccess*")} | Get-ClientAccessServer | Where {$_.OutlookAnywhereEnabled -Eq $True} | ForEach {Set-OutlookAnywhere "$_\RPC (Default Web Site)" -ClientAuthenticationMethod Basic -SSLoffloading $False -ExternalHostName mail.gooddealmart.ca -IISAuthenticationMethod Basic}
|
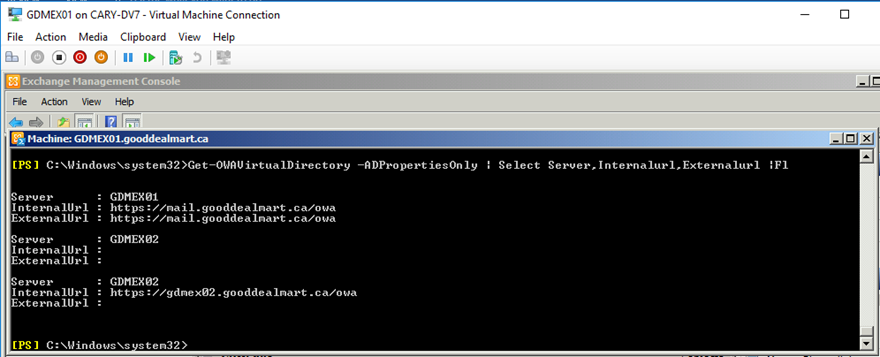
4. Run follow cmdlet to check OWA Virtual Directory
Get-OWAVirtualDirectory -ADPropertiesOnly | Select Server,Internalurl,Externalurl | Fl
 Note NoteRun follow cmdlet to change settings. Get-OWAVirtualDirectory -Server GDMEX01 | Set-OWAVirtualDirectory -ExternalUrl mail.gooddealmart.ca/owa -InternalUrl mail.gooddealmart.ca/owa
|
5. Run follow cmdlet to check ECP Virtual Directory
Get-ECPVirtualDirectory -ADPropertiesOnly | Select Server,Internalurl,Externalurl | Fl
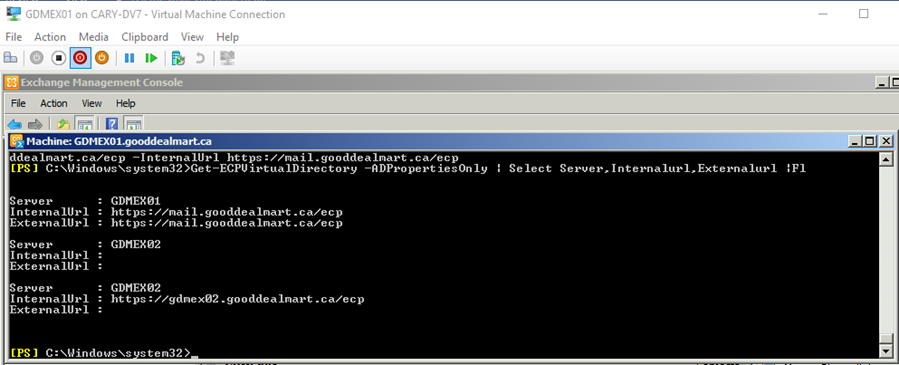
 Note NoteRun follow cmdlet to change settings. Get-ECPVirtualDirectory -Server GDMEX01 | Set-ECPVirtualDirectory -ExternalUrl mail.gooddealmart.ca/ecp -InternalUrl mail.gooddealmart.ca/ecp
|
6. Run follow cmdlet to check OAB Virtual Directory
Get-OABVirtualDirectory -ADPropertiesOnly | Select Server,Internalurl,Externalurl | Fl
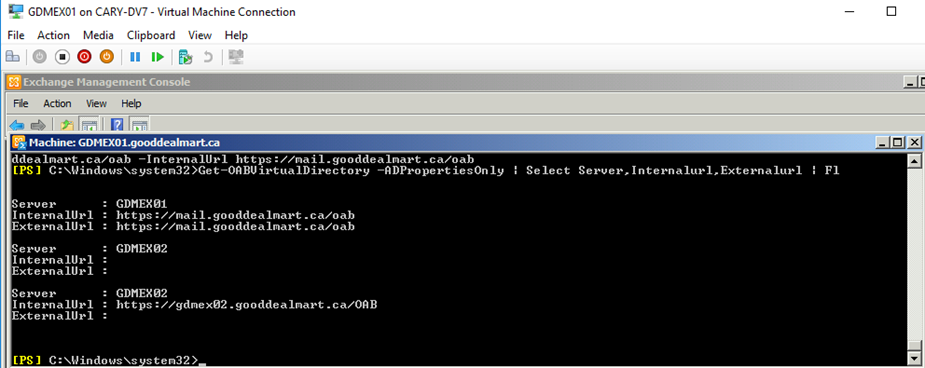
 Note NoteRun follow cmdlet to change settings. Get-OABVirtualDirectory -Server GDMEX01 | Set-OABVirtualDirectory -ExternalUrl mail.gooddealmart.ca/OAB -InternalUrl mail.gooddealmart.ca/OAB
|
7. Run follow cmdlet to check WebServices Virtual Directory
Get-WebServicesVirtualDirectory -ADPropertiesOnly | Select Server,Internalurl,Externalurl | Fl
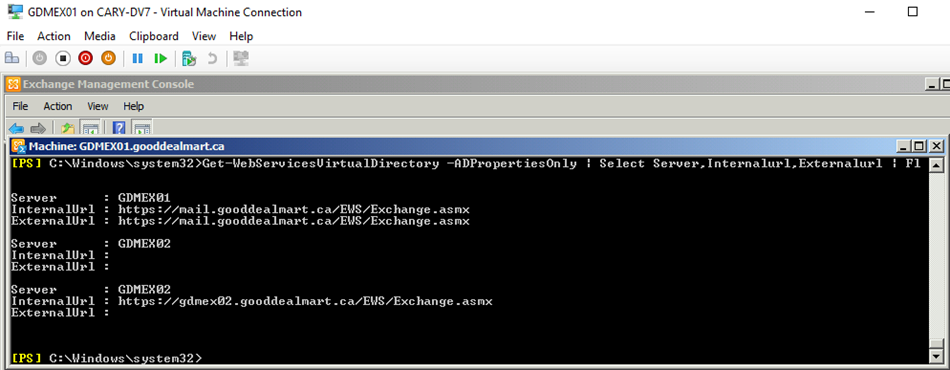
 Note NoteRun follow cmdlet to change settings. Get-WebServicesVirtualDirectory -Server GDMEX01 | Set-WebServicesVirtualDirectory -ExternalUrl mail.gooddealmart.ca/EWS/Exchange.asmx -InternalUrl mail.gooddealmart.ca/EWS/Exchange.asmx
|
8. Run follow cmdlet to check ActiveSync Virtual Directory
Get-ActiveSyncVirtualDirectory -ADPropertiesOnly | Select Server,Internalurl,Externalurl | Fl
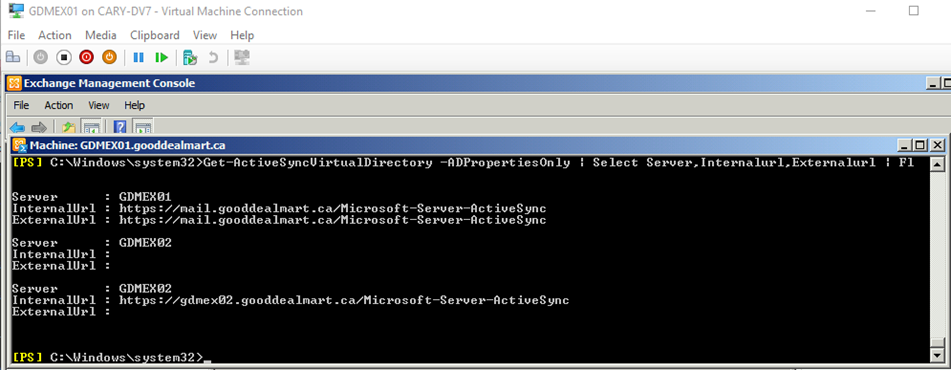
 Note NoteRun follow cmdlet to change settings. Get-ActiveSyncVirtualDirectory -Server GDMEX01 | Set-ActiveSyncVirtualDirectory -ExternalUrl mail.gooddealmart.ca/Microsoft-Server-ActiveSync -InternalUrl mail.gooddealmart.ca/Microsoft-Server-ActiveSync
|
9. Run follow cmdlet to check ClientAccessServer Virtual Directory
Get-ClientAccessServer | Select Identity,AutodiscoverServiceInternaluri
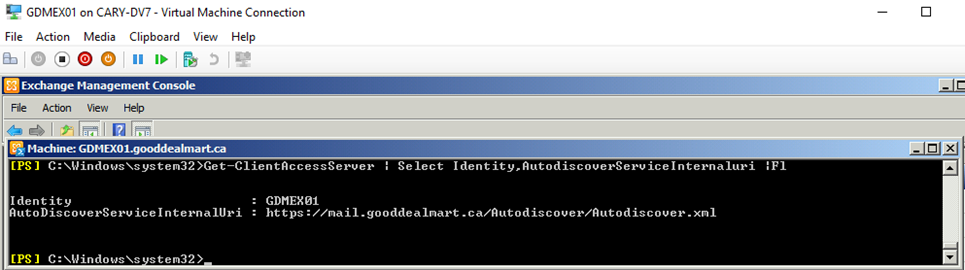
 Note NoteRun follow cmdlet to change settings. Set-ClientAccessServer -Identity GDMEX01 -AutodiscoverServiceInternalUri <a href="https://mail.gooddealmart.ca/Autodiscover/Autodiscover.xml"/></strong>https://mail.gooddealmart.ca/Autodiscover/Autodiscover.xml<strong>
|
Configuring the Autodiscover Services Connection Point (SCP) for Exchange 2016 Server
- Login to Exchange 2016 server.
- Open Exchange Management Shell
-
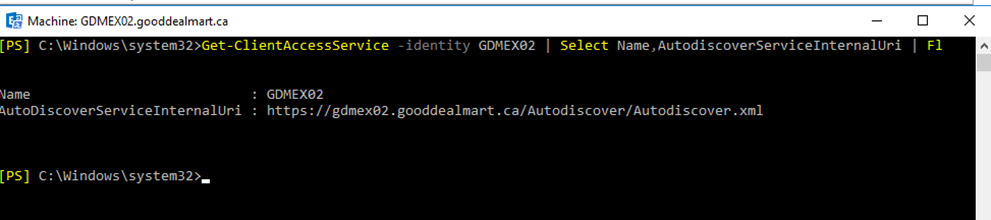
Run follow cmdlet to check the existing Autodiscover SCP settings.
Get-ClientAccessService -Identity GDMEX02 | Select Name,AutodiscoverServiceInternalUri | Fl
-
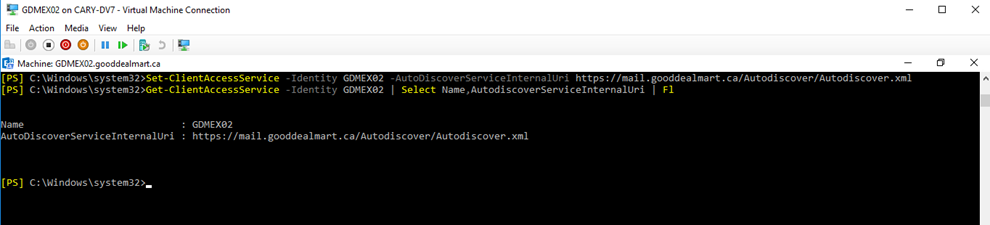
Run follow cmdlet to update Autidiscover SCP
Set-ClientAccessService -Identity GDMEX02 -AutoDiscoverServiceInternalUri https://mail.gooddealmart.ca/Autodiscover/Autodiscover.xml
Configuring the Client Access Namespaces for Exchange 2016 Server
- Login Exchange 2016 Server.
- Open Exchange Management Shell
-
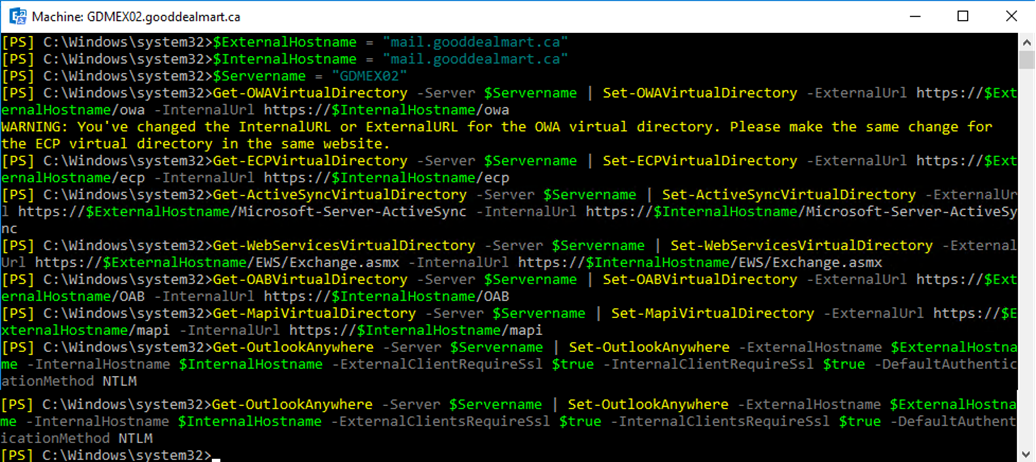
Run follow cmdlet to change namespaces settings.
$ExternalHostname = "mail.gooddealmart.ca"
$InternalHostname = "mail.gooddealmart.ca"
&$Servername = "GDMEX02"
Get-OWAVirtualDirectory -Server $Servername | Set-OWAVirtualDirectory -ExternalUrl https://$ExternalHostname/owa" -InternalUrl https://$InternalHostname/owa
Get-ECPVirtualDirectory -Server $Servername | Set-ECPVirtualDirectory -ExternalUrl https://$ExternalHostname/ecp -InternalUrl https://$InternalHostname/ecp
Get-ActiveSyncVirtualDirectory -Server $Servername | Set-ActiveSyncVirtualDirectory -ExternalUrl https://$ExternalHostname/Microsoft-Server-ActiveSync -InternalUrl https://$InternalHostname/Microsoft-Server-ActiveSync
Get-WebServicesVirtualDirectory -Server $Servername | Set-WebServicesVirtualDirectory -ExternalUrl https://$ExternalHostname/EWS/Exchange.asmx -InternalUrl https://$InternalHostname/EWS/Exchange.asmx
Get-OABVirtualDirectory -Server $Servername | Set-OABVirtualDirectory -ExternalUrl https://$ExternalHostname/OAB -InternalUrl https://$InternalHostname/OAB
Get-MapiVirtualDirectory -Server $Servername | Set-MapiVirtualDirectory -ExternalUrl https://$ExternalHostname/mapi -InternalUrl https://$InternalHostname/Mapi
Get-OutlookAnywhere -Server $Servername | Set-OutlookAnywhere -ExternalHostname $ExternalHostname -InternalHostname $InternalHostname -ExternalClientsRequireSsl $true -InternalClientsRequireSsl $true -DefaultAuthenticationMethod NTLM
Testing the Client Access Namespaces
We can use a host to test with pilot users and make sure there are no issues.
- Login to a pilot user’s desktop.
- Open hosts file from c:\Windows\System32\drivers\etc
-
Add mail.gooddealmart.ca map to the IP of exchange 2016 server, save and then close the hosts file
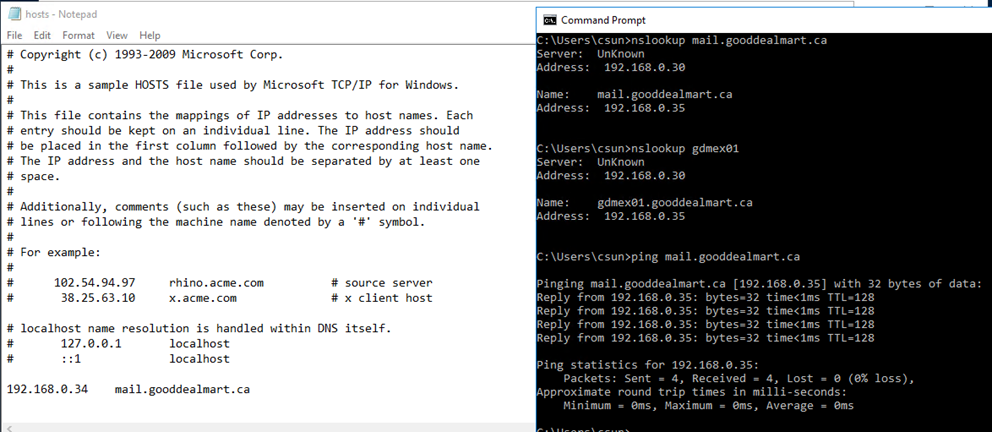
- Open outlook from the desktop of pilot user and make sure there are no issues.
Cut Over the Client Access namespace to Windows 2016
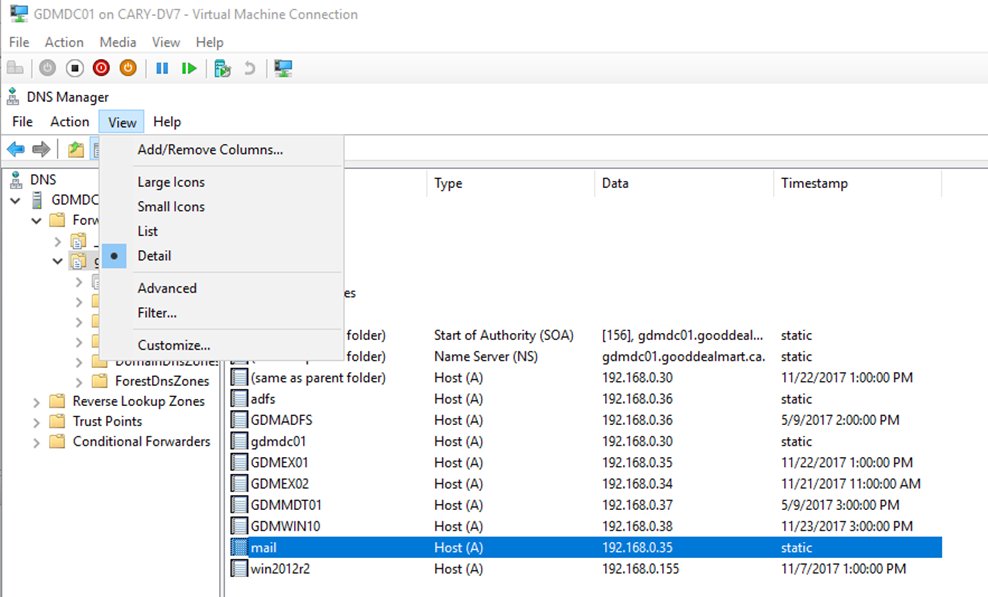
- Login to Domain Controller Server and make DNS change for internal clients
- Open DNS Manager tool
-
Select View and click Advanced
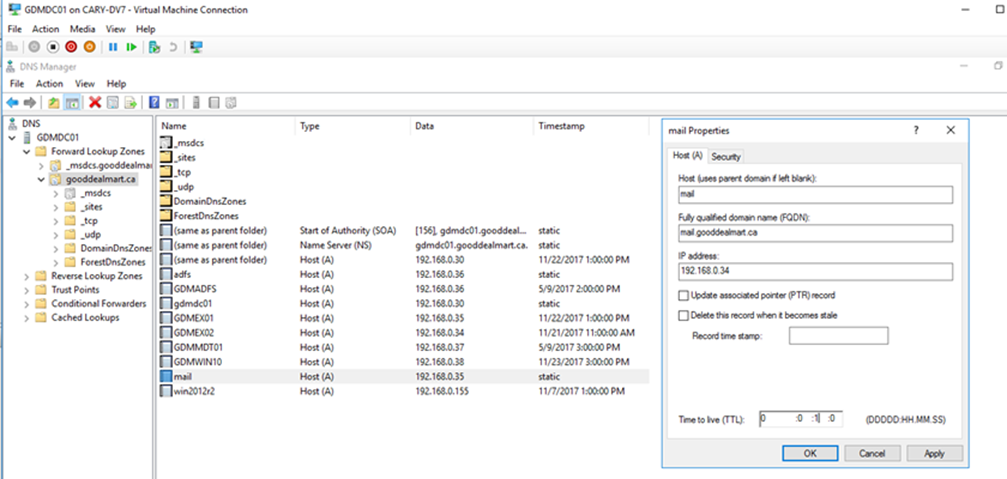
- Change mail.gooddealmart.ca IP address to the same as Exchange 2016 server.
-
Change the TTL from 1 HH to 1 MM and then click OK
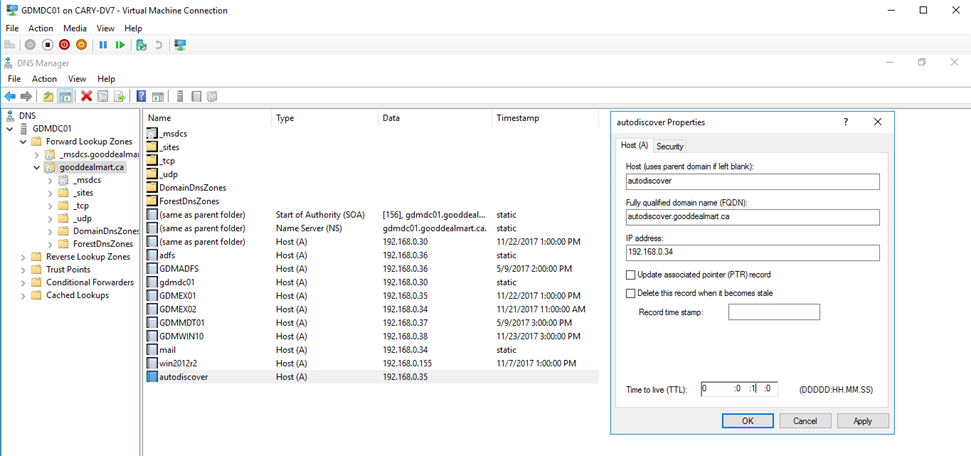
- Change autodiscover.gooddealmart.ca IP address to the same as Exchange 2016 server
-
Change the TTL from 1 HH to 1 MM and then click OK
- Change firewall NAT settings for external clients, make sure change the NAT map form exchange 2010 IP Address to exchange 2016 server IP Address
Hope you enjoy this post.
Cary Sun @sifusun
- Login Exchange 2016 Server.
Very nice post. I just stumbled upon your blog and wanted to say that I’ve really enjoyed surfing around your blog posts. After all I’ll be subscribing to your rss feed and I hope you write again very soon!
I really enjoy the article post.Really looking forward to read more. Really Great.